How To Make A Wattle And Daub House
What is a Wattle and Daub House? Wattle and daub refers to a type of construction where a house is made a lattice of wooden strips called wattle is plastered/daubed with wet soil, clay, sand, and straw.
The first part is the wattle! The wattle is made by weaving thin branches that are either whole or split between vertical stakes. Think of the stakes as the 2x4 studs in a typical home today and the weaving branches as the plywood walls.
 Daub is nothing more that dirt and grass or something similar and although this sounds simple you must use only certain materials to actually have a plaster/daub that is effective. Good daub will contain three things, binders, aggregates and reinforcement.
Binders hold the mix together and can be made of clay or lime, usually clay. Aggregates are added to the daub material to make it go further. Aggregate is usually either sand or small pebbles. Reinforcement is provided by straw, hair, hay and helps hold the mix together as well as to control shrinkage and provide flexibility, so think rebar. Once thoroughly mixed the daub is applied to the wattle and allowed to dry.
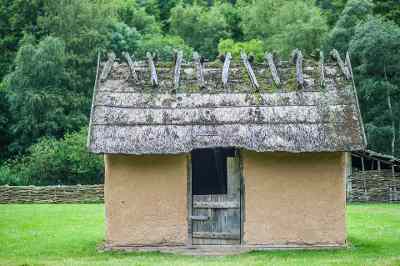
The picture above is a great illustration of what you can expect. Pay attention to the walls of the house, which show a finished daub wall. Also, notice the fence in the background. The fence is made on the same principle as the wattle daub wall, just without the daub.
A wattle daub when house building only addresses the walls of the structure. The roof and floor and doors can be interchanged. I have seen roofs of hay on up to tile roofs. Which roof you choose to build is entirely up to you.
 The basic wattle wall consists of first setting forearm sized poles into the ground (or other material) at regularly spaced intervals, then small trees are cut down and weaved between the vertical poles in a horizontal alternating fashion that holds them firmly in place. The first horizontal weave starts at the ground and the wall is built up by placing successive horizontal limbs on top. Alternate the side of the vertical pole that the weaved limb go on so that the vertical poles remain straight, as the alternation of the weave prevents all of the force to be all in one direction resulting in the vertical poles bending inward or outward.
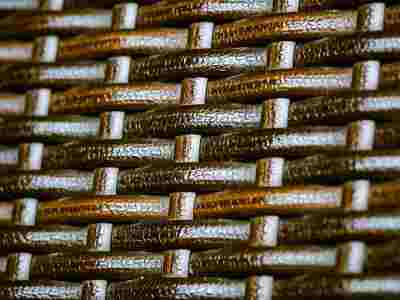
The second picture is not of a wall, but of a basket. However, it is a great illustration of how the wattle wall is constructed. The only difference being, that the wattle wall will be made of larger sturdier material than the rattan basket pictured here. Refer to this picture to get a better understanding of the wattle concept.
After the walls are built the next step is to plaster the walls with your wet clay daub mixture. Be sure to use clay and not just regular dirt or the wall will surely not last.
Hair is a good reinforcement material, but grass is much more commonly used. Hair just isn't often available in the quantity needed.
Tips:
If at all possible construct the wattle wall on top of something instead of directly on the ground. Do this by having a foundation of timbers for each wall or even concrete or drilled stone. This will prevent the wall from deteriorating and greatly prolong the life of the wall.
It is important to note that a daub wall is not designed for load bearing. So to add a roof you will need to use the vertical poles as support with a cross member on top to build off of.
When applying the daub you will need to press it in firmly from both sides to completely cover the wattle. Be diligent to not leave any air pockets.
Since a daub wall is made of soil it will be subject to weathering by rain. It is possible to waterproof the walls to some extent by using Linseed oil aka Flaxseed oil. Simply paint the oil generously onto your cob/daub wall! If you do not have enough oil to do all the walls then start at the bottom and work your way upwards. The bottom will get wet first and stay wet the longest! Protecting the bottom will serve you best.
The first part is the wattle! The wattle is made by weaving thin branches that are either whole or split between vertical stakes. Think of the stakes as the 2x4 studs in a typical home today and the weaving branches as the plywood walls.

Binders hold the mix together and can be made of clay or lime, usually clay. Aggregates are added to the daub material to make it go further. Aggregate is usually either sand or small pebbles. Reinforcement is provided by straw, hair, hay and helps hold the mix together as well as to control shrinkage and provide flexibility, so think rebar. Once thoroughly mixed the daub is applied to the wattle and allowed to dry.
The picture above is a great illustration of what you can expect. Pay attention to the walls of the house, which show a finished daub wall. Also, notice the fence in the background. The fence is made on the same principle as the wattle daub wall, just without the daub.
A wattle daub when house building only addresses the walls of the structure. The roof and floor and doors can be interchanged. I have seen roofs of hay on up to tile roofs. Which roof you choose to build is entirely up to you.

The second picture is not of a wall, but of a basket. However, it is a great illustration of how the wattle wall is constructed. The only difference being, that the wattle wall will be made of larger sturdier material than the rattan basket pictured here. Refer to this picture to get a better understanding of the wattle concept.
After the walls are built the next step is to plaster the walls with your wet clay daub mixture. Be sure to use clay and not just regular dirt or the wall will surely not last.
Hair is a good reinforcement material, but grass is much more commonly used. Hair just isn't often available in the quantity needed.
Tips:
If at all possible construct the wattle wall on top of something instead of directly on the ground. Do this by having a foundation of timbers for each wall or even concrete or drilled stone. This will prevent the wall from deteriorating and greatly prolong the life of the wall.
It is important to note that a daub wall is not designed for load bearing. So to add a roof you will need to use the vertical poles as support with a cross member on top to build off of.
When applying the daub you will need to press it in firmly from both sides to completely cover the wattle. Be diligent to not leave any air pockets.
Since a daub wall is made of soil it will be subject to weathering by rain. It is possible to waterproof the walls to some extent by using Linseed oil aka Flaxseed oil. Simply paint the oil generously onto your cob/daub wall! If you do not have enough oil to do all the walls then start at the bottom and work your way upwards. The bottom will get wet first and stay wet the longest! Protecting the bottom will serve you best.
