Blacksmithing Getting Started
What is a Blacksmith?
Traditionally a blacksmith is a person who uses a forge to heat iron, a hammer and other tools to work the heated iron and an anvil as the working surface to make or repair things made of iron. However Blacksmiths can also work with other metals such as steel. Bronze, steel, even aluminum are examples of metals that can be worked by a blacksmith. Here is a link to various metals and a summary of their composition, uses, properties and characteristics. Metal Properties
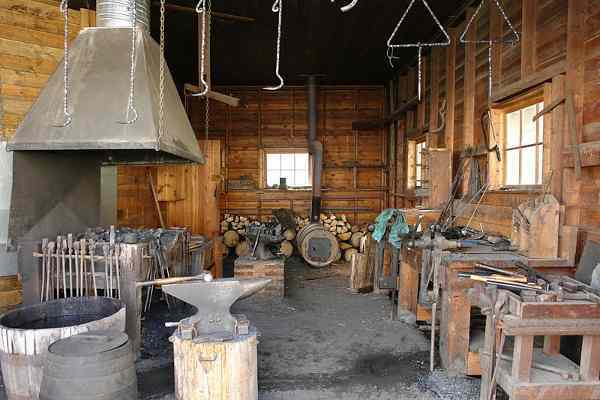
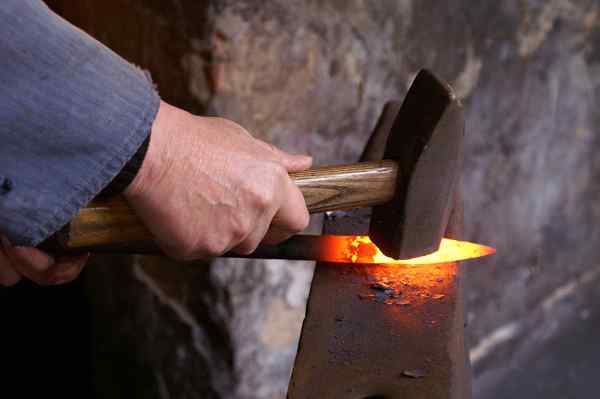 There are three essential components to Blacksmithing, something to heat the metal, something to work the metal and something to work the metal on. Blacksmithing like carpentry, electrician, instrument tech and others, each have a plethora of tools but it isn't essential to have all the tools to get started. Don't worry if you don't have one of the many specialized pieces first stick with the three necessities and grow from there over time.
Note:
When setting up your forge be sure it is a safe distance away from any flammable material. This includes walls, floor or furnishings.
Be sure to always have a bucket of water handy and a fire extinguisher if at all possible.
Protective Clothing is also a must. You will be dealing with extremely hot material. You will need protective clothing including apron, gloves, eye protection etc.
The Forge: So let's address the first of the three, the forge! Forges come in all manner of sizes and orders of complexity. Don't be put off by the cost of some of the forges on the market as they are not required. A forge can be made from something as simple as a bellows or a hair-drier and some cinder blocks or heck dirt if you are in a pinch. Some things to consider are, where is the forge going to be located? If it is going to be indoors, then the forge will absolutely have to have a chimney to direct the smoke from the forge out of the building.
Most forges are made of brick or cast iron because those materials can withstand fairly high temperatures. Now any forge should have a way to force air into the fire. This is needed because the fire will burn hotter if air is forced into it. Most modern forges use some sort of blower, DIY kind of folks often use hair dryers. In the ancient past bellows were used. The choice is up to you!
The bellows blow air into the fire pit via a pipe or tube of some sort. This can be made of iron, some other metal, clay, dirt etc. Like I said a source of forced air is all that is absolutely required for a forge. The rest is just for convenience. Kids today dabbling in blacksmithing often get by just fine with a hairdryer and a couple of cinder blocks.
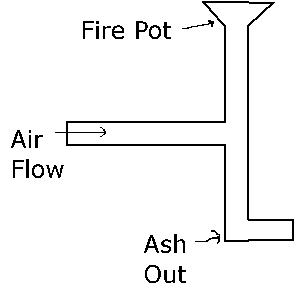
The next part of the forge is called the fire pot. The fire pot is as simple as a depression in the ground, but more advanced fire pits have a few additions that make life easier. Basically a fire pit is like a bowl with an opening at the bottom. The Bellows blow air up into the fire pit from below. The bellows are positioned off to the side and connected via pipe or tunnel. Often there is another outlet that allows for the removal of ash without disturbing the operation of the fire pit.
As the fuel burns the ash will fall down potentially plugging the air flow from the bellows. View the picture below to see how the ash is removed from the air passageway.
 Obviously you must have a grating or just small openings at the bottom of the fire pot to prevent the fuel from falling through before it has turned mostly to ash.
And lastly if you are not doing an open air forge, meaning you are undercover or in a building of some sort your forge will need a chimney to help draw the smoke out. A chimney does not need a fan or blower, the hot air from the fire will rise, drawing in air from below.
Fuel: Charcoal, coal and propane or the most common fuels that are burned as fuel in a forge. Coal is preferred by many because it can be shaped and sized to heat larger pieces of metal and it can achieve higher temperatures than propane or charcoal. Whereas, as propane forge is going to be limited to the configuration of the gas jets built into the forge and can't be adjusted. Charcoal works just fine also and will probably be the only fuel most people will have access to if the SHTF.
Hammers: The next essential piece of the puzzle to begin blacksmithing is a hammer or hammers! There are many specialized hammers available to blacksmiths. You are only required to have one! Don't worry that you don't have a wide assortment of hammers. Start with one and add to your collection as you see fit.
More About Blacksmith Hammers
Tongs: Tongs are an essential piece of equipment for any Blacksmith. Blacksmiths work by heating usually iron or another metal like steel in a forge. As a metal is heated it becomes softer and easier to work. The metal is heated until it becomes soft enough for shaping with Blacksmithing tools, such as a hammer, anvil and chisel. Tongs are basically an extension of the Blacksmith's hand. With tongs the blacksmith is able to hold and position the very hot pieces of metal that he is working on. You might try to get by by using pliers instead of tongs. However tongs are typically longer than pliers. They put critical distance between you and the hot metal or you and the hot forge. As the tongs hold the hot metal, the heat will transfer from the hot iron to the tongs. Longer tongs help mitigate the heat transfer issue by lengthening the amount of time it takes for the heat to reach your hand. More about tongs! Tongs
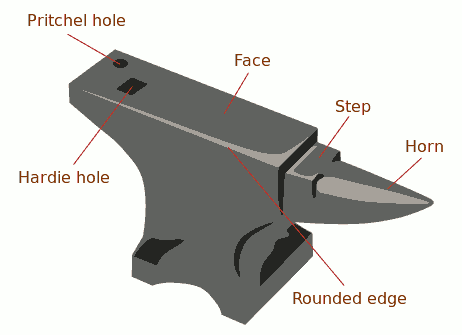 Anvil: The last, but not least, essential piece to have is an Anvil. There are a number of different styles to choose from and can be quite expensive. Don't let this deter you. A starting anvil can be nothing more than a piece of railroad iron. The best anvils will be large and have both a Hardy hole and a Pritchel hole. The Hardy hole is a square hole that is used to hold special tools for performing specific Blacksmithing tasks. The Pritchel hole is used along with a punch for making a hole in a piece of metal. For example, a flat piece of hot iron is placed over the hole and a punch is hammered into the metal with the punch eventually passing through the metal and down into the Pritchel hole in the anvil.
Other Tools: There are a million other tools used by Blacksmiths to enhance the anvil, hammer and tongs. One such group of tools are called Hardy tools. They are named after the Hardy hole that they drop into on an anvil to keep them solidly in place without turning. Read more about various Hardy tools here!
Swage Tool - The Swiss Army Knife for Blacksmiths!
Leg Vice - A vice unique to Blacksmithing!
Improvised DIY twisting tool!
Blacksmith Techniques: So now you have all the tools, but like any craft the tools are not worth a darn unless you have the skills to put them to good use. That skill will come with knowing and practicing these techniques.
Cutting: Self-explanatory. This is the process of taking a piece of metal and using tools to cut it; separate it into two pieces.
Bending- Process of hammering a piece of metal so that it bends.
Drawing- Drawing is the technique of lengthening a piece of metal by hammering it so that its length is increased while reducing its thickness.
Tapering- Tapering is the technique of taking a piece of metal and hammering it into the shape of a sharpened pencil.
Upsetting- Basically the opposite of tapering. With this technique you hammer the end of a piece of metal to flare out the end a bit, usually so that the flared end is bigger and will prevent the peg from traveling all the way through a hole.
Spreading- Hammering on a flat piece of metal to make it spread. It will be wider in one direction while growing thinner in the other direction.
Punching- This technique requires an extra tool called a punch. The punch hammered repeatedly on a piece of metal directly over the Pritchel hole if your anvil has one.
Slitting- This is the technique similar to cutting but you do not separate the piece completely. An example is if you wanted to make a traditional crowbar that has the notched V at one end or the claw of a claw hammer.
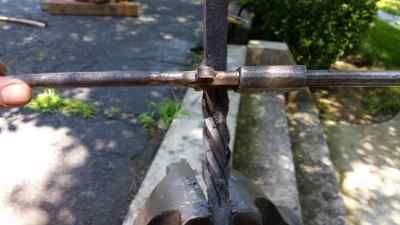
Twisting- Twisting is a technique where you take a piece of usually square stock and twist the metal. It will twist most where the metal is the hottest. This will require you to vary the section of the metal that is hot to adjust where the twist occurs. This is usually for decorative purposes.
More Detailed Explanation of Techniques.
Visit my friends at: www.TheIronForgeFire.com and http://www.blacksmithtoolshed.com/

Note:
When setting up your forge be sure it is a safe distance away from any flammable material. This includes walls, floor or furnishings.
Be sure to always have a bucket of water handy and a fire extinguisher if at all possible.
Protective Clothing is also a must. You will be dealing with extremely hot material. You will need protective clothing including apron, gloves, eye protection etc.
The Forge: So let's address the first of the three, the forge! Forges come in all manner of sizes and orders of complexity. Don't be put off by the cost of some of the forges on the market as they are not required. A forge can be made from something as simple as a bellows or a hair-drier and some cinder blocks or heck dirt if you are in a pinch. Some things to consider are, where is the forge going to be located? If it is going to be indoors, then the forge will absolutely have to have a chimney to direct the smoke from the forge out of the building.
Most forges are made of brick or cast iron because those materials can withstand fairly high temperatures. Now any forge should have a way to force air into the fire. This is needed because the fire will burn hotter if air is forced into it. Most modern forges use some sort of blower, DIY kind of folks often use hair dryers. In the ancient past bellows were used. The choice is up to you!
The bellows blow air into the fire pit via a pipe or tube of some sort. This can be made of iron, some other metal, clay, dirt etc. Like I said a source of forced air is all that is absolutely required for a forge. The rest is just for convenience. Kids today dabbling in blacksmithing often get by just fine with a hairdryer and a couple of cinder blocks.
The next part of the forge is called the fire pot. The fire pot is as simple as a depression in the ground, but more advanced fire pits have a few additions that make life easier. Basically a fire pit is like a bowl with an opening at the bottom. The Bellows blow air up into the fire pit from below. The bellows are positioned off to the side and connected via pipe or tunnel. Often there is another outlet that allows for the removal of ash without disturbing the operation of the fire pit.
As the fuel burns the ash will fall down potentially plugging the air flow from the bellows. View the picture below to see how the ash is removed from the air passageway.

And lastly if you are not doing an open air forge, meaning you are undercover or in a building of some sort your forge will need a chimney to help draw the smoke out. A chimney does not need a fan or blower, the hot air from the fire will rise, drawing in air from below.
Fuel: Charcoal, coal and propane or the most common fuels that are burned as fuel in a forge. Coal is preferred by many because it can be shaped and sized to heat larger pieces of metal and it can achieve higher temperatures than propane or charcoal. Whereas, as propane forge is going to be limited to the configuration of the gas jets built into the forge and can't be adjusted. Charcoal works just fine also and will probably be the only fuel most people will have access to if the SHTF.
Hammers: The next essential piece of the puzzle to begin blacksmithing is a hammer or hammers! There are many specialized hammers available to blacksmiths. You are only required to have one! Don't worry that you don't have a wide assortment of hammers. Start with one and add to your collection as you see fit.
More About Blacksmith Hammers

Tongs: Tongs are an essential piece of equipment for any Blacksmith. Blacksmiths work by heating usually iron or another metal like steel in a forge. As a metal is heated it becomes softer and easier to work. The metal is heated until it becomes soft enough for shaping with Blacksmithing tools, such as a hammer, anvil and chisel. Tongs are basically an extension of the Blacksmith's hand. With tongs the blacksmith is able to hold and position the very hot pieces of metal that he is working on. You might try to get by by using pliers instead of tongs. However tongs are typically longer than pliers. They put critical distance between you and the hot metal or you and the hot forge. As the tongs hold the hot metal, the heat will transfer from the hot iron to the tongs. Longer tongs help mitigate the heat transfer issue by lengthening the amount of time it takes for the heat to reach your hand. More about tongs! Tongs
 Anvil: The last, but not least, essential piece to have is an Anvil. There are a number of different styles to choose from and can be quite expensive. Don't let this deter you. A starting anvil can be nothing more than a piece of railroad iron. The best anvils will be large and have both a Hardy hole and a Pritchel hole. The Hardy hole is a square hole that is used to hold special tools for performing specific Blacksmithing tasks. The Pritchel hole is used along with a punch for making a hole in a piece of metal. For example, a flat piece of hot iron is placed over the hole and a punch is hammered into the metal with the punch eventually passing through the metal and down into the Pritchel hole in the anvil.
Other Tools: There are a million other tools used by Blacksmiths to enhance the anvil, hammer and tongs. One such group of tools are called Hardy tools. They are named after the Hardy hole that they drop into on an anvil to keep them solidly in place without turning. Read more about various Hardy tools here!
Swage Tool - The Swiss Army Knife for Blacksmiths!
Leg Vice - A vice unique to Blacksmithing!
Improvised DIY twisting tool!

Blacksmith Techniques: So now you have all the tools, but like any craft the tools are not worth a darn unless you have the skills to put them to good use. That skill will come with knowing and practicing these techniques.
Cutting: Self-explanatory. This is the process of taking a piece of metal and using tools to cut it; separate it into two pieces.
Bending- Process of hammering a piece of metal so that it bends.
Drawing- Drawing is the technique of lengthening a piece of metal by hammering it so that its length is increased while reducing its thickness.
Tapering- Tapering is the technique of taking a piece of metal and hammering it into the shape of a sharpened pencil.
Upsetting- Basically the opposite of tapering. With this technique you hammer the end of a piece of metal to flare out the end a bit, usually so that the flared end is bigger and will prevent the peg from traveling all the way through a hole.
Spreading- Hammering on a flat piece of metal to make it spread. It will be wider in one direction while growing thinner in the other direction.
Punching- This technique requires an extra tool called a punch. The punch hammered repeatedly on a piece of metal directly over the Pritchel hole if your anvil has one.
Slitting- This is the technique similar to cutting but you do not separate the piece completely. An example is if you wanted to make a traditional crowbar that has the notched V at one end or the claw of a claw hammer.
Twisting- Twisting is a technique where you take a piece of usually square stock and twist the metal. It will twist most where the metal is the hottest. This will require you to vary the section of the metal that is hot to adjust where the twist occurs. This is usually for decorative purposes.
More Detailed Explanation of Techniques.
Visit my friends at: www.TheIronForgeFire.com and http://www.blacksmithtoolshed.com/
